
From docker build to OCI Images: The Hidden Journey Behind Your Docker Container


Have you ever wondered how your Dockerfile and your project files on disk become a runnable container image that gets deployed to your Kubernetes cluster, used by other developers? This blog post goes beyond Docker as the fix for “Works on my machine”.

You don't need to understand any of this to write a working Dockerfile. Most people don't, and that's completely fine. You copy definitions that work, tweak them for your project, and ship it. This post is for when you want to know why that pattern works, what actually happens between docker build and a running container, and how to make smarter decisions when something goes wrong or a build feels slow.
The basics
Before we get to go and do a deep dive, let's clarify a few key terms and concepts:
- Build context: Set of files that your container build can access.
- Dockerfile: Text file with step-by-step instructions that define the container.
- BuildKit: Tool that reads the Dockerfile and turns it into a container image.
- OCI Image: Standardized format for packaging a container image.
By the end, you’ll understand how Docker builds work and feel like a seasoned container builder who can navigate these components with confidence.
Step 1: Preparing The Build Context—Where it all starts
Think of the build context as the departure port of your Docker build journey. It’s the directory you specify when running docker build, containing your Dockerfile and all the files needed for the build. The Docker client compresses this directory into a tarball and sends it to the BuildKit daemon, much like a ship’s cargo being loaded onto a vessel.
You likely already wrote commands like this:
docker build -t my-image .
Here, . is your departure port—the current directory. And it's going to create an image called my-image you can run using docker run my-image.
What happens
When you run this command, your build context is prepared, filtered and sent to the BuildKit daemon.
1 — Resolve the build context path
The path gets resolved to an absolute directory, e.g. . gets converted to /home/timo/my-container, which has the following structure:
my-container/
├── .dockerignore
├── .env
├── Dockerfile
├── entrypoint.sh
├── pyproject.toml
├── scripts/
│   ├── dev.sh
│   └── publish.sh
└── src/
    ├── foo.py
    └── cli.py
2 — Resolve effective file set
Docker checks for the .dockerignore file, which works similarly to a gitignore.
scripts/
.env*
This would effectively exclude the scripts' folder which should never be part of any container image and .env, which potentially contains secrets that should never be part of container images.
3 — Create tar ball
All files that have been found in /home/timo/my-container and have not been filtered out are now bundled into a tar ball, effectively the following directory structure:
my-container/
├── Dockerfile
├── entrypoint.sh
├── pyproject.toml
└── src/
    ├── foo.py
    └── cli.py
All files listed here are combined into a single tar ball, keeping ownership and file permissions as they are present on the current file system.
What this means in practice
- Use a
.dockerignorefile to exclude files likenode_modulesor.git, reducing your context size and avoiding unnecessary cache invalidations. This is also very useful for excluding local secrets etc. - Be aware that your files need to be processed before the image can be built. Smaller build contexts lead to faster builds.
Step 2: Parse the Dockerfile — Defining your container image
A Dockerfile is your blueprint, a set of instructions that define every step of your journey. Most instructions create a new layer in your image, like adding cargo to your ship. Metadata-only instructions like ENV or LABEL are recorded in the image history but don't add file system layers — you'll see these marked as empty_layer: true later.
Let's assume the Dockerfile looks like this:
# syntax=docker/dockerfile:1
# ↑ DIRECTIVE: optional parser directive, must be first line

# Global ARG (available before FROM)
ARG BASE_IMAGE=ubuntu:24.04

# -------------------------------------------------------
# Stage 1: builder
# -------------------------------------------------------
FROM ${BASE_IMAGE} AS builder

# ARG (scoped to this stage)
ARG APP_VERSION=1.0.0

# LABEL: metadata key-value pairs attached to the image
LABEL maintainer="[email protected]" \
      version="${APP_VERSION}" \
      description="Dockerfile for my cool image"

# ENV: environment variables available at build AND runtime
ENV APP_HOME=/app \
    APP_ENV=production

# WORKDIR: sets (and creates) the working directory
WORKDIR ${APP_HOME}

# COPY: copies files from the build context into the image
COPY src/ ./src/
COPY entrypoint.sh entrypoint

# RUN: executes a command during build (creates a new layer)
RUN --mount=type=cache,target=/var/cache/apt \
    apt-get update \
    && apt-get install -y \
      curl \
    && rm -rf /var/lib/apt/lists/*

# -------------------------------------------------------
# Stage 2: final image
# -------------------------------------------------------
FROM ${BASE_IMAGE}

WORKDIR /app

# COPY --from: copies from a named build stage (multi-stage build)
COPY --from=builder /app ./

# USER: sets the user for subsequent RUN, CMD, ENTRYPOINT instructions
RUN useradd --system appuser
USER appuser

# VOLUME: declares a mount point for external/persistent storage
VOLUME ["/app/data"]

# ENTRYPOINT: the fixed executable that always runs
ENTRYPOINT ["/app/entrypoint"]
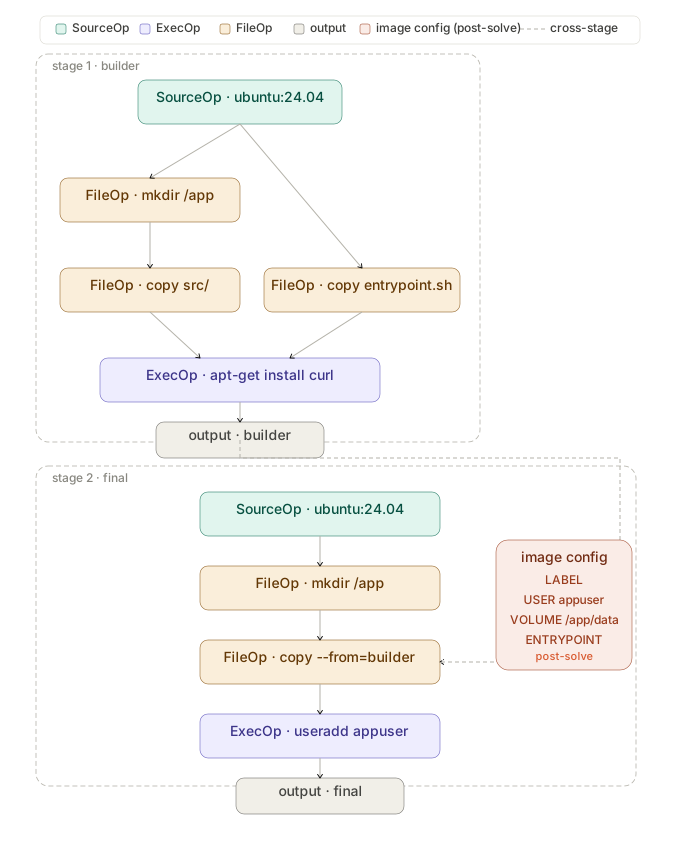
1 — Translate to BuildKit Intermediate Format
The Dockerfile is a text-based frontend for BuildKit. Frontends are components that run inside BuildKit and convert any build definition into LLB (Low-Level Build).
BuildKit builds are based on LLB, a binary intermediate format that defines the dependency graph for the processes involved in your build. In short, LLB is to Dockerfile what LLVM IR is to C. If that doesn't land: think of it like a recipe card for a restaurant kitchen. Your Dockerfile is the dish description a customer orders — BuildKit translates it into a precise, step-by-step kitchen ticket that the cooks (the build workers) can execute in parallel without stepping on each other. An intermediate representation that enables optimized, efficient builds.
For the Dockerfile, this kind of looks like this (simplified):
2 — Solve the build instructions based on LLB
Using the intermediate output format, BuildKit constructs a Directed Acyclic Graph (DAG). This allows it to efficiently cache layers and build independent steps in parallel where applicable.
Step 3: Execute the build — Creating the actual artifact
Each build step is executed within an ephemeral, isolated container environment using an OCI-compliant runtime such as runc. This ensures complete isolation and reproducibility, as each step runs in a fresh, temporary container with its file system and process space. This happens for each layer.
1 — Check for cached layer
Each layer build is reproducible: the same base image and inputs yield the same outputs. If a step’s inputs haven’t changed, the solver reuses the cached result, skipping temporary container creation and execution entirely.
2 — Create temporary container
For each step in the LLB DAG (e.g., FROM, RUN, COPY), BuildKit starts a temporary container. The container is created using an OCI-compliant runtime, such as runc or crun. The runtime pulls the base image (if specified) and sets up the container’s file system and environment.
3 — Set up file system
The container’s file system is populated according to the build step.
- Source files (e.g., local directories, Git repos) are mounted as needed.
- Cache layers are mounted if the step is cached and unchanged.
- Secrets, SSH agents, or tmpfs are mounted based on the step’s requirements.
Secrets and SSH keys deserve special attention here. The naive approach to just copy files or passing as ARG leak them permanently into the layer history. BuildKit's --secret and --ssh mounts solve this: The secret is available during that RUN step only and never written to any layer.
# Mount a secret — never stored in the image
RUN --mount=type=secret,id=MY_TOKEN \
    curl -H "Authorization: $(cat /run/secrets/MY_TOKEN)" https://example.com

# Mount your SSH agent — useful for private Git dependencies
RUN --mount=type=ssh \
    git clone [email protected]:your-org/private-repo.git

# Mount a single file from the build context for one RUN only
RUN --mount=type=bind,source=pyproject.toml,target=/tmp/pyproject.toml \
    pip install -r /tmp/pyproject.toml
Even if a credential expires after the build, it remains extractable from the image layer indefinitely, anyone with registry access can retrieve it. Always treat credentials as secrets regardless of their lifetime.
4 — Execute the process
The runtime executes the step’s process (e.g., a shell command in a RUN instruction). This runs in an ephemeral, isolated environment, ensuring it doesn’t affect other steps or the host system. All outputs (files, logs, image layers) are captured and hashed for content-addressability.
5 — Clean up temporary environment
After the step completes, the temporary container is stopped and removed. Only the step’s outputs (and their hashes) are retained, ensuring a clean workspace for subsequent steps.
6 — Cache output
The step is populated into the cache. This can either be on the local file system, in a S3 Bucket, local storage or inside the BuildKit daemon's storage.
For package managers, BuildKit also supports persistent cache mounts with RUN --mount=type=cache. Unlike layer caching, these persist across builds even when earlier layers are invalidated. So apt, pip, or npm don't re-download packages from scratch every time.
# apt (Debian/Ubuntu)
RUN --mount=type=cache,target=/var/cache/apt \
    apt-get update && apt-get install -y curl

# pip
RUN --mount=type=cache,target=/root/.cache/pip \
    pip install -r requirements.txt

# npm
RUN --mount=type=cache,target=/root/.npm \
    npm ci
What this means in practice
- While caching is layer-based, too many layers can slow down your build and increase the final image size. Combine related commands into a single
RUNinstruction to optimize both caching and image size. - Put stable instructions first (e.g.,
FROM,WORKDIR), so rebuilds for layers that rarely change don't happen when it's not necessary.
Step 4: Output a container image
After all steps are executed, the final image is assembled and output as an OCI-compliant or docker container image. This can either be loaded into the docker daemon or containerd for direct usage, pushed to a remote registry or written to a tar file on the host.
1 — Layer Finalization (Content-Addressable Store)
Each layer diff (file system snapshot) gets:
- Compressed (typically GZIP or ZSTD) into a blob
- Hashed (SHA256) to produce a
DiffID(uncompressed) and aDigest(compressed) - Stored in BuildKit's content store, keyed by digest
The distinction matters: the DiffID goes into the image config, the Digest goes into the manifest.
2 — Image Config Construction
BuildKit assembles the image config JSON (application/vnd.oci.image.config.v1+json), which contains:
rootfs.diff_ids— ordered list of uncompressed layer SHA256shistory— one entry per layer (or empty step), with timestamps, created-by commands, andempty_layer: truefor cache-only steps- Environment, entry point, cmd, labels, exposed ports, etc. (from
ENV,ENTRYPOINT,CMD,LABELinstructions) architecture,osfields
This config blob is itself hashed and stored in the content store, its digest becomes the image ID.
3 — Manifest Construction
BuildKit then builds the OCI image manifest (application/vnd.oci.image.manifest.v1+json):
{
  "schemaVersion": 2,
  "mediaType": "application/vnd.oci.image.manifest.v1+json",
  "config": {
    "mediaType": "application/vnd.oci.image.config.v1+json",
    "digest": "sha256:<config-hash>",
    "size": 1234
  },
  "layers": [
    { "mediaType": "application/vnd.oci.image.layer.v1.tar+gzip", "digest": "sha256:<layer1>", "size": ... },
    { "mediaType": "application/vnd.oci.image.layer.v1.tar+gzip", "digest": "sha256:<layer2>", "size": ... }
  ]
}
The manifest references the compressed layer digests. It is itself hashed — that digest is what you see in docker pull image@sha256:....
4 — (Multi-platform) Manifest Index
If building for multiple platforms, BuildKit wraps everything in an OCI image index (application/vnd.oci.image.index.v1+json) — a manifest-of-manifests pointing to each per-platform manifest. The CLI tool for this is docker buildx, which lets you target multiple platforms in a single build:
docker buildx build \
  --platform linux/amd64,linux/arm64 \
  -t my-image \
  --push .
Buildx creates a separate image per platform, finalizes each manifest, then stitches them together into the index and publishes everything in one shot.
5 — Export / Push
Depending on the --output target:
- Registry push: blobs are pushed first (layers, then config), manifest is pushed last (atomically makes the image available)
dockerexporter: re-packs into Docker'simage/tarformat and loads into the daemon via the image storeociexporter: writes the OCI layout to disk (index.json,blobs/sha256/...)local/tarexporters: extract the merged file system, bypassing the layer structure entirely
By default, when used via docker build it uses the docker exporter to make it available to the docker daemon right away.
What this means in practice
- Two images sharing a layer don't duplicate it in the registry or your container storage, the digest is the same, so the blob is only stored once. It's also why
docker pullskips layers you already have locally. - The manifest digest (
sha256:...) is what you pin when you writeimage@sha256:...in your Kubernetes manifests or Dockerfiles. Pinning this instead of a tag gives you true immutability — a tag can be overwritten, a digest cannot. - The multi-platform manifest is what makes
docker pullon an ARM get a different binary than on an AMD64, despite pulling the same image name. The registry picks the right per-platform manifest transparently. - The config digest is what Docker shows as the image ID (
docker images --no-trunc). If two builds produce identical layers and config, they get the same image ID — content-addressability means no duplication. - In CI, prefer
docker buildx build --pushoverdocker build+docker push. If you need less overhead or are running in a rootless environment, you can invoke BuildKit directly viabuildctlor usedocker buildx bakefor multi-image pipelines — both skip the Docker daemon entirely, which matters in sandboxed CI runners where the daemon socket isn't available.
Wrapping Up
From a directory on your disk to a layered, content-addressable OCI artifact: what looks like a simple docker build is actually a well-orchestrated pipeline. BuildKit parses your Dockerfile into an optimized execution graph, runs each step in isolation, and produces an image format that any OCI-compliant runtime can consume — whether that's Docker, containerd, podman, or your Kubernetes node.
So to summarize, the most critical takeaways:
- Keep your build context small with
.dockerignore - Never pass secrets via
ARGorCOPY— use--mount=type=secret - Use
--mount=type=cachefor package manager directories (/var/cache/apt,/root/.cache/pip,/root/.npm) — packages survive cache invalidation without being baked into the image - Use
--mount=type=bindto make a single file available for oneRUNstep only, without copying it into the layer permanently - Layer order matters: stable instructions first, changing ones last
- Pin images by digest in production, not by tag
- Use
docker buildx build --pushin CI for cache-aware, multi-platform builds
More Resources
If you want to go deeper on the tooling side: docker buildx, the BuildKit source and buildctl are worth exploring, and dive is great for inspecting what's actually in your layers. For the specs themselves, the OCI Image spec and BuildKit docs map closely to what's covered here.
If you're looking for practical tips on distroless images, layer ordering, and least-privilege — Small things for building better container images and Building secure python container images for production cover distroless images, layer ordering, and least-privilege — both slightly dated, but still solid.